
[16/1/14 edit — as the procedure for finding data in Mac OS were detailed in class, I am going to leave off editing this post to show Mac OS steps in detail because: steps are mostly the same; and we’ve practised them in class.]
In this post, we shall 1. load data into R workspace; 2. get summary statistics for those data; 3. plot visualizations of the data distributions — histograms; and 4. finish up by closing and saving the .R file.
For this post, I am going to assume that you know about files, folders and directories on your computer. In Windows (e.g. in XP and 7), you should be familiar with Windows Explorer. (For Macs, we would be working with Finder and within Finder with F+Get Info.) If you are not familiar with Windows Explorer, this series of videos e.g. here on Windows Explorer should get you to where you understand: the difference between a file and a folder; file types; the navigation, file folder directory; how to get the details view of files in folders; how to sort e.g. by name or date in folders. N.B. the screenshots of folders in the following will look different to you compared to Windows Explorer as it normally appears in Windows 7. That is because I use xplorer2, as I find it easier to move stuff around.
Just as in other statistics applications e.g. SPSS, data can be entered manually, or imported from an external source. Here I will talk about: 1. loading files into the R workspace as dataframe object; 2. getting summary statistics for the variables in the dataframe; 3. and plotting visualization of data distributions that will be helpful to making sense of the dataframe.
1. Loading files into the R workspace as dataframe object
Start by getting your data files
I often do data collection using paper-and-pencil standardized tests of reading ability and also DMDX scripts running e.g. a lexical decision task testing online visual word recognition. Typically, I end up with an excel spreadsheet file called subject scores 210413.xlsx and a DMDX output data file called lexical decision experiment 210413.azk. I’ll talk about the experimental data collection data files another time.
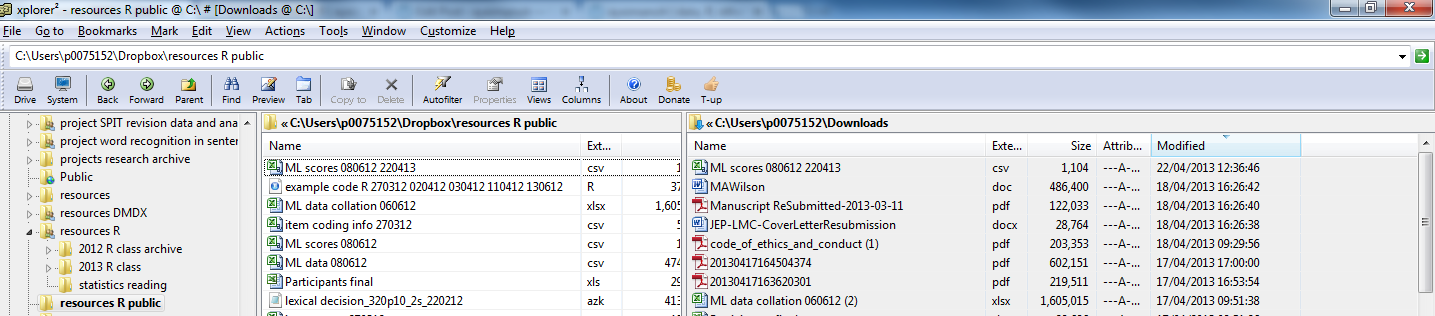
The paper and pencil stuff gets entered into the subject scores database by hand. Usually, the spreadsheets come with notes to myself on what was happening during testing. To prepare for analysis, though, I will often want just a spreadsheet showing columns and rows of data, where the columns are named sensibly (meaningful names, I can understand) with no spaces in either column names or in entries in data cells. Something that looks like this:

This is a screen shot of a file called: ML scores 080612 220413.csv
— which you can download here.
These data were collected in an experimental study of reading, the ML study.
The file is in .csv (comma separated values) format. I find this format easy to use in my workflow –collect data–tidy in excel–output to csv–read into R–analyse in R, but you can get any kind of data you can think of into R (SPSS .sav or .dat, .xlsx, stuff from the internet — no problem).
Let’s assume you’ve just downloaded the database and, in Windows, it has ended up in your downloads folder. I will make life easier for myself by copying the file into a folder whose location I know.
— I know that sounds simple but I often work with collaborators who do not know where their files are.
I’ll just copy the file from the downloads folder into a folder I called R resources public:
Advice to you
Your lives, and my life, if I am working with you, will be easier if you are systematic and consistent about your folders: if I am supervising you, I expect to see an experiment for each folder, and in that sub-folders for – stimulus set selection; data collection script and materials; raw data files; (tidied) collated data; and analysis.
Read a data file into the R workspace
I have talked about the workspace before, here we are getting to load data into it using the functions setwd() and read.csv().
In R, you need to tell it where your data can be found, and where to put the outputs (e.g. pdfs of a plot). You need to tell it the working directory (see my advice earlier about folders): this is going to be the Windows folder where you put the data you wish to analyse.
For this example, the folder is:
C:\Users\me\Dropbox\resources R public
[Do you know what this is – I mean, the equivalent, on your computer? If not, see the video above – or get a Windows for Dummies book or the like.]
What does R think the working directory currently is? You can find out, run the getwd() command:
getwd()
and you will likely get told this:
> getwd()
[1] "C:/Users/p0075152/Documents"
The Documents folder is not where the data file is, so you set the working directory using setwd()
setwd("C:/Users/me/Dropbox/resources R public")
Notice: 1. the address in explorer will have all the slashes facing backwards but “\” in R is a special operator, escape so 2. the address given in setwd() has all slashes facing forward 3. the address is in “” and 4. of course if you spell this wrong R will give you an error message. I tend to copy the address from Windows Explorer, and change the slashes by hand in the R script.
Load the data file using the read.csv() function
subjects <- read.csv("ML scores 080612 220413.csv", header=T, na.strings = "-999")
Notice:
1. subjects… — I am calling the dataframe something sensible
2. …<- read.csv(…) — this is the part of the code loading the file into the workspace
3. …(“ML scores 080612 220413.csv”…) — the file has to be named, spelled correctly, and have the .csv suffix given
4. …, header = T… — I am asking for the column names to be included in the subjects dataframe resulting from this function call
5. … na.strings = “-999” … — I am asking R to code -999 values, where they are found, as NA – in R, NA means Not Available i.e. a missing value.
Things that can go wrong here:
— you did not set the working directory to the folder where the file is
— you misspelled the file name
— either error will cause R to tell you the file does not exist (it does, just not where you said it was)
I recommend you try making these errors and getting the error message deliberately. Making errors is a good thing in R.
Note:
— coding missing values systematically is a good thing -999 works for me because it never occurs in real life for my reading experiments
— you can code for missing values in excel in the csv before you get to this stage
Let’s assume you did the command correctly, what do you see? This:
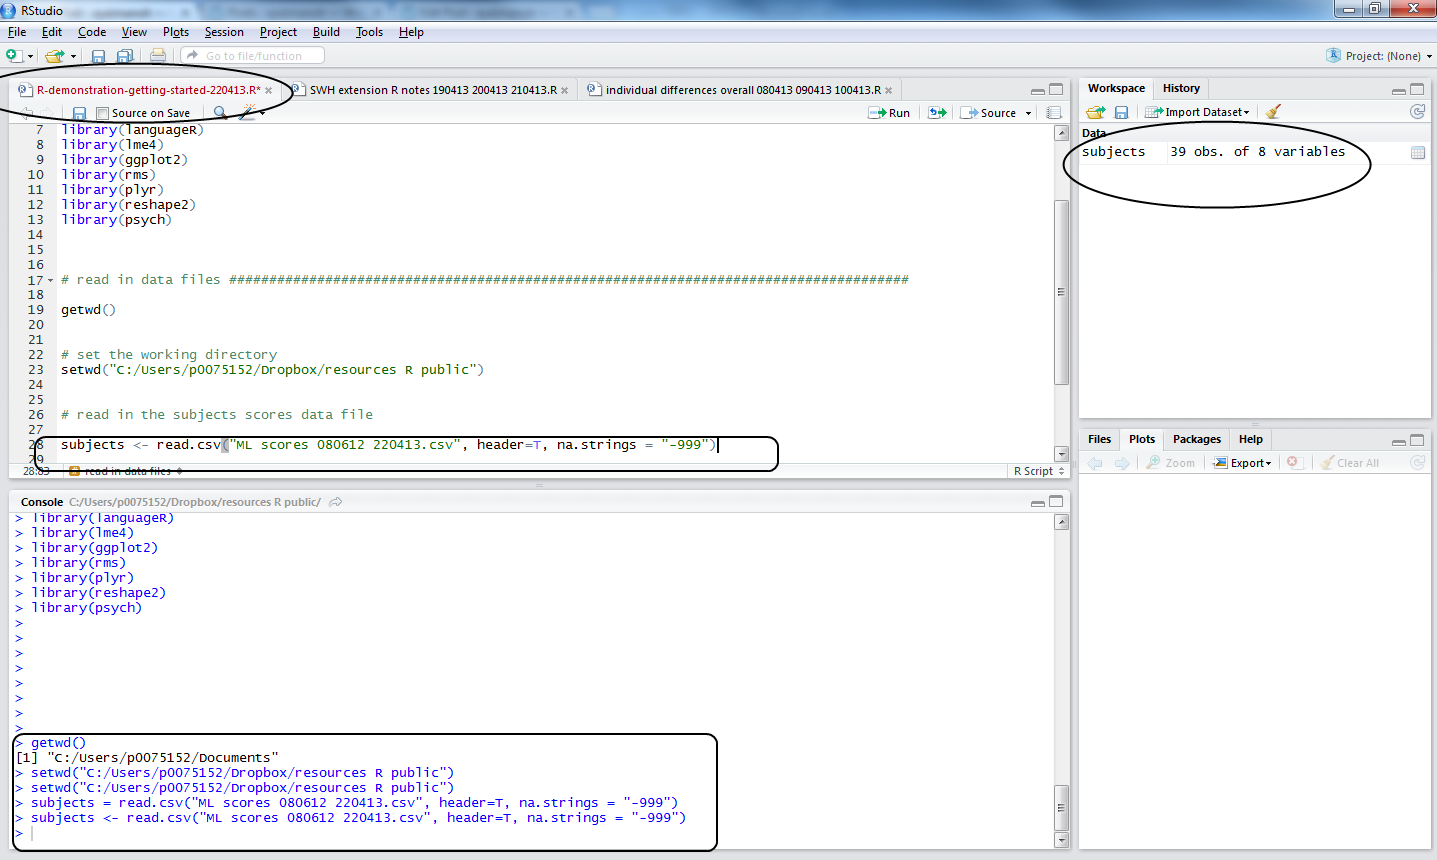
Notice:
1. in the workspace window, you can see the dataframe object, subjects, you have now created
2. in the console window, you can see the commands executed
3. in the script window, you can see the code used
4. the file name, top of the script window, went from black to red, showing a change has been made but not yet saved.
To save a change, keyboard shortcut is CTRL-S.
2. Getting summary statistics for the variables in the dataframe
It is worth reminding ourselves that R is, among other things, an object-oriented programming language. See this:
The entities that R creates and manipulates are known as objects. These may be variables, arrays of numbers, character strings, functions, or more general structures built from such components.
During an R session, objects are created and stored by name (we discuss this process in the next session). The R command
> objects()(alternatively,
ls()) can be used to display the names of (most of) the objects which are currently stored within R. The collection of objects currently stored is called the workspace.
[R introduction: http://cran.r-project.org/doc/manuals/r-release/R-intro.html#Data-permanency-and-removing-objects]
or this helpful video by ajdamico.
So, we have created an object using the read.csv() function. We know that object was a .csv file holding subject scores data. In R, in the workspace, it is an object that is a dataframe, a structure much like the spreadsheets in excel, SPSS etc.: columns are variables and rows are observations, with columns that can correspond to variables of different types (e.g. factors, numbers etc.) Most of the time, we’ll be using dataframes in our analyses.
You can view the dataframe by running the command:
view(subjects)
— or actually just clicking on the name of the dataframe in the workspace window in R-studio, to see:

Note: you cannot edit the file in that window, try it.
I am going to skip over a whole bunch of stuff on how R deals with data. A useful Quick-R tutorial can be found here. The R-in-Action book, which builds on that website, will tell you that R has a wide variety of objects for holding data: scalars, vectors, matrices, arrays, dataframes, and lists. I mostly work with dataframes and vectors, so that’s mostly what we’ll encounter here.
Now that we have created an object, we can interrogate it. We can ask what columns are in the subjects dataframe, how many variables there are, what the average values of the variables are, if there are missing values, and so on using an array of useful functions:
head(subjects, n = 2)

summary(subjects)

describe(subjects)

str(subjects)

psych::describe(subjects)

length(subjects)

length(subjects$Age)
Copy-paste these commands into the script window and run them, below is what you will see in the console:
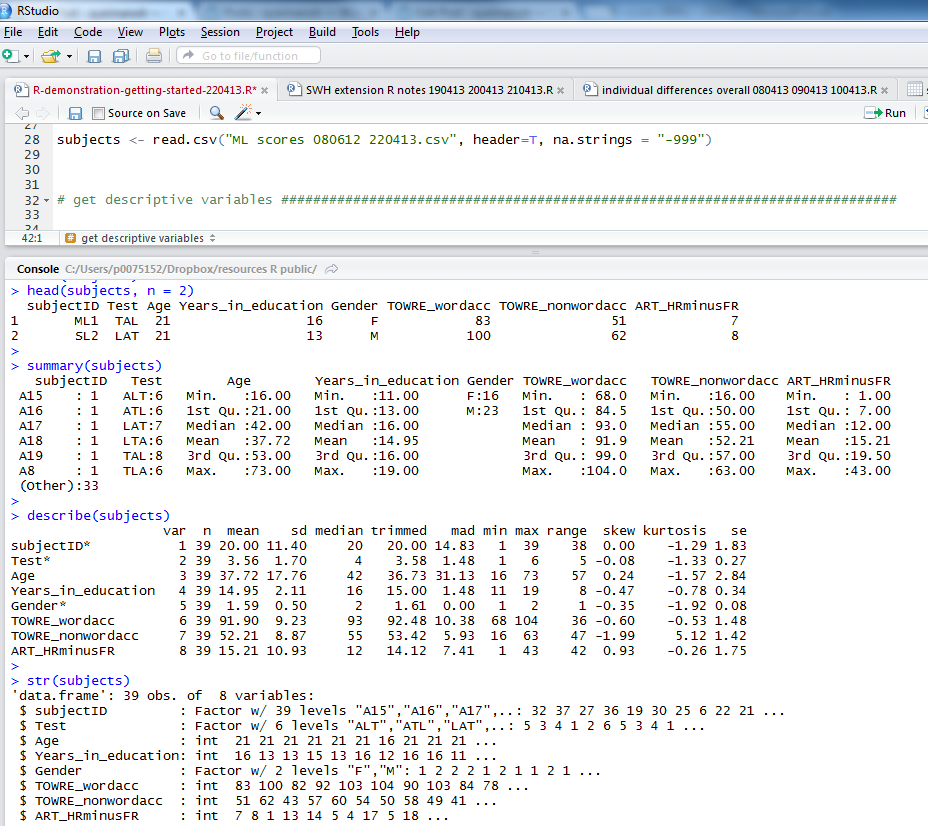
Notice:
1. the head() function gives you the top rows, showing column names and data in cells; I asked for 2 rows of data with n = 2
2. the summary() function gives you: minimum, maximum, median and quartile values for numeric variables, numbers of observations with one or other levels for factors, and will tell you if there are any missing values, NAs
3. describe() (from the psych package) will give you means, SDs, the kind of thing you report in tables in articles
4. str() will tell you if variables are factors, integers etc.
If I were writing a report on this subjects data I would copy the output from describe() into excel, format it for APA, and stick it in a word document.
3. Plotting visualization of data distributions
These summary statistics will not give you the whole picture that you need. Mean estimates of the centre of the data distribution can be deceptive, hiding pathologies like multimodality, skew, and so on. What we really need to do is to look at the distributions of the data and, unsurprisingly, in R, the tools for doing so are excellent. Let’s start with histograms.
[Here, I will use the geom_histogram, see the documentation online.]
We are going to examine the distribution of the Age variable, age in years for ML’s participants, using the ggplot() function as follows:
pAge <- ggplot(subjects, aes(x=Age))
pAge + geom_histogram()
Notice:
— We are asking ggplot() to map the Age variable to the x-axis i.e. we are asking for a presentation of one variable.
If you copy-paste the code into the script window and run it three things will happen:
1. You’ll see the commands appear in the lower console window
2. You’ll see the pAge object listed in the upper right workspace window

Notice:
— When you ask for geom_histogram(), you are asking for a bar plot plus a statistical transformation (stat_bin) which assigns observations to bins (ranges of values in the variable)
— calculates the count (number) of observations in each bin
— or – if you prefer – the density (percentage of total/bar width) of observations in each bin
— the height of the bar gives you the count, the width of the bin spans values in the variable for which you want the count
— by default, geom_histogram will bin data to the range in values/30 but you can ask for more or less detail by specifying binwidth, this is what R means when it says:
>stat_bin: binwidth defaulted to range/30. Use 'binwidth = x' to
adjust this.
3. We see the resulting plot in the plot window, which we can export as a pdf:

Notice:
— ML tested many people in their 20s – no surprise, a student mostly tests students – plus a smallish number of people in middle age and older (parents, grandparents)
— nothing seems wrong with these data – no funny values
Exercise
Now examine the distribution of the other variables, TOWRE word and TOWRE nonword reading accuracy, adapt the code, by substituting the variable name with the names of these variables, do one plot for each variable:
pAge <- ggplot(subjects, aes(x=????))
pAge + geom_histogram()
Notice:
— In my opinion, at least one variable has a value that merits further thought.
4. What do you do when you’re finished?
OK, so you’ve been writing some killer code and you’ve produced a super graph, appearing in the plot window, how do you save it? You can click on the export button:

— you’ll be asked if you want to save the plot as an image (you’ll then be asked what format you want, .jpeg and .png are good for most purposes), as a pdf (my preference), or copy it to the clipboard so that you can paste it somewhere (like a word document, I suppose).
What about the script? In RStudio, go to the file menu then Save-As and you will see this:

— Choose a name: something-sensible-dated.R
— And save it to where you can find it.
What have we learnt?
The R code used in this post can be downloaded here. Download it and use it with the database provided.
[For my postgraduate students coming to this post, see the .R file in the Week One practical materials folder.]
In this post, we learnt about:
1. Putting data files into folders on your computer.
2. The workspace, the working directory and how to set it in R using setwd().
3. How to read a file into the workspace (from the working directory = folder on your computer) using read.csv().
4. How to inspect the dataframe object using functions like summary() or describe().
5. How to plot histograms to examine the distributions of variables.
Key vocabulary
working directory
workspace
object
dataframe
NA, missing value
csv
histogram
